DJI Mavic, Air and Mini Drones
Friendly, Helpful & Knowledgeable Community
Join Us Now

Adobe's Photoshop bundle vs dedicated apps

Antero52

Well-Known Member
Joined
Oct 20, 2018
Messages
82
Reactions
61
Age
71
Location
Vantaa, Finland
In another thread, there was some discussion about Adobe's Photoshop bundle (Lightroom, Photoshop, Bridge) versus dedicated apps for specific purposes. I argued that while the Photoshop bundle is the best overall suite, it cannot beat dedicated apps. Some members were not convinced.

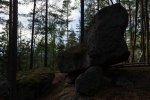
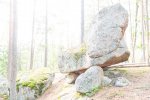
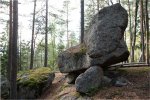
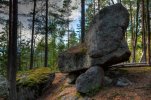
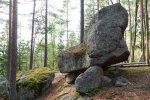
Here's an example of what I mean. The first three shots are a bracketed series from my DSLR (Normal plus 3EV shots under and over). The fourth image is a HDR merge created by Lightroom. As you can see, it is almost identical with the first shot (normal exposure). What you cannot see without opening it in LR or PS, is that the result of LR's HDR process is clipped at both ends (shadows and highlights), and the sky is hopelessly washed out.

The fifth image is created from the first three shots in Photomatix. Photomatix has several merge algorithms to choose from, each with multiple factory-created presets and setting sliders. You may feel that the megalith (created by the retreating ice masses some 10,000 years ago) looks over-dramatic, but this is intentional, as I feel that the megalith looks like some petrified monster.1_Normal.jpg2_-3EV.jpg3_+3EV.jpg4_Lightroom.jpg5_Photomatix.jpg
 
I am willing to believe that a product with a dedicated mission in life may be better than a 'swiss army knife' of a product, but that still leaves some questions:

Which release/product of LR are you using? 'Classic' I assume, but 11.1 (Camera Raw 14.1) or an earlier version? LR is constantly being updated so unless you're on the most recent version the results may not be representative of the current state of the product.

Did you use 'auto settings' or not? My understanding is if you turn off auto, then YOU have control of the tone mapping after the compression has taken place. This may get past your clipping issue. You'd still have to put in the work, but LR also has the ability to use/create presets. I tried it both ways: with it turned on it did seem to replicate the 'best exposed' shot, with it turned off the image was darker (histogram pushed to the left) but I was able to bring up the shadows post-merge (see attached shot).

What level did you have 'de-ghosting' set at?

Not disputing your conclusions... just pointing out more testing and analysis may be needed to better understand the limitations of LR.

About the attached shot. This was never intended to be anything more than a quick-and-dirty snapshot of holiday decorations. Taken handheld (de-ghosting high); 5 frames 1 EV apart in full auto mode (so camera varied the ISO as shutter speed was already as slow as the algorithm would allow). Nikon D850 with Tokina AT-X 24-70mm lens at f2.8, 24mm, 5 frames 1 EV apart, 1/25th, ISO varied from 450 to 7200)
 

Attachments

  • XMAS_Front_Door.jpg
    XMAS_Front_Door.jpg
    523.5 KB · Views: 23
  • Like
Reactions: DougMcC
In another thread, there was some discussion about Adobe's Photoshop bundle (Lightroom, Photoshop, Bridge) versus dedicated apps for specific purposes. I argued that while the Photoshop bundle is the best overall suite, it cannot beat dedicated apps. Some members were not convinced.

Here's an example of what I mean. The first three shots are a bracketed series from my DSLR (Normal plus 3EV shots under and over). The fourth image is a HDR merge created by Lightroom. As you can see, it is almost identical with the first shot (normal exposure). What you cannot see without opening it in LR or PS, is that the result of LR's HDR process is clipped at both ends (shadows and highlights), and the sky is hopelessly washed out.

The fifth image is created from the first three shots in Photomatix. Photomatix has several merge algorithms to choose from, each with multiple factory-created presets and setting sliders. You may feel that the megalith (created by the retreating ice masses some 10,000 years ago) looks over-dramatic, but this is intentional, as I feel that the megalith looks like some petrified monster.View attachment 141515View attachment 141516View attachment 141517

You should merge just the first and second photo in LR. You aren’t using any of the 3rd photo so it’s just mucking things up. Also if you just brings the highlights way down on the merged LR photo you already have you’d be able to recover those highlights.

The way Lightroom does HDR is inherently different from Photomatrix. When you merge HDR in Lightroom it retains all the original raw information and you have more dynamic range than could possibly be displayed so you have to move the information around so it’s it’s within legal values. You assumed that just because the darks and lights are clipped that information is lost. That’s not the case. You’ll be able to recover that information by moving it around.

One incredibly powerful new tool in LR for HDRs is the select sky feature. It’s the best of any program I’ve ever used. You’d easily be able to recover the sky detail with that tool.

In my opinion LR has actually done a much better job of creating the HDR than Photomatrix. That’s a much better starting point and there’s are some errors in the Photomatrix image that aren’t a in the LR copy.

If you share the original RAWs I can show you what you can do with LR.

As far as the overall concept that dedicated apps are better than PS/LR I guess you’ll have to give me more examples. There may be some programs that do one thing really well but I have yet to come across a professional workflow that doesn’t include Photoshop and as far as I know the LR/PS bundle is still the cheapest way to get PS.
 
Last edited:
  • Like
Reactions: JimSteadman
Also for the very best results you would manually blend the first and second image in Photoshop so I guess that begs the question what do you mean by “best?” The best final result or the fastest and easiest way. Photoshop is usually the answer to the best final result but often it’s rarely the easiest way to do complex things.
 
  • Like
Reactions: Big Bro
Ok. I recently participated in another thread, in which the HDR processing abilities of Photoshop and Lightroom were discussed. When I was about to post my examples (the ones shown in #1 of this thread), I couldn't immediately locate the earlier thread, which is this one:


It was specifically post #16 which said "I haven't had any issues using AEB and HDR on Adobe Lightroom CC. Combined with the ability to easily manipulate images using masks/sliders it's a great product."

Because that post referred to Lightroom, I wanted to give an example of Lightroom's abilities (or lack thereof) as regards HDR processing. I am using Adobe's Photoshop bundle, which includes Lightroom Classic and is always up-to-date.

Brett#s response shows results from Photoshop. I admit that PS does HDR processing much better than LR does (particularly in the first phase of merging multiple LDR images to a single HDR image, and is less successful in the second phase of mapping the HDR image to a single LDR image).

For the results shown in this thread, I tried both with and without "Auto Settings". The resultant image is slightly different, but LR Classic does not enable any additional settings even if I disable "Auto Settings".

I know that maximal artistic impact often requires that the HDR process result is further adjusted through normal image-adjustment techniques. But in my experiment the end result of LR is so poor that the sky cannot be salvaged. The clouds, which were mostly taken from the middle ("normal") exposure, are hopelessly blown out.

I also know that LR comes with presets, but these are for the normal single-image processing. I can't find any presets (or even any adjustments apart from a minimal set for deghosting), which would control the HDR processing.

Brett says in #4 that "The way Lightroom does HDR is inherently different from Photomatrix. When you merge HDR in Lightroom it retains all the original raw information and you have more dynamic range than could possibly be displayed so you have to move the information around so it’s it’s within legal values. You assumed that just because the darks and lights are clipped that information is lost. That’s not the case. You’ll be able to recover that information by moving it around."

I am not sure about what is meant by "When you merge HDR in Lightroom it retains all the original raw information". If this means original raw information after LR has done the merging, I believe what Brett says, but that's not good enough for me. If the HDR merge results in clipped highlights, retaining the clipped hightlights is exactly my problem.

On the other hand, if Brett means retaining all the original raw information of the totality of LDR images fed into the HDR process, then I don't believe this is true. A single file which retains all the raw information from all the original LDR images requires a bit depth bigger than that of normal raw images. If a photographer wants to create an intermediate file that retains all information from all original LDR images, they usually do so using EXR file format, which is a 32-bit exponential format. Photoshop and Photomatix can process these but LR apparently cannot.
 
I downloaded the low res images you posted and manually blended the first two together in photoshop and here's the result with my photoshop layers showing. If I had the full res raws I could have done a better job. From here you could stylize to taste. View attachment 141532
I think this post sums it up for me. The OP'sresults didn't look like HDR output from LR that I have experienced, it looked like the first exposure at +0. It's possible the settings, auto vs manual were somehow gummed up.

I agree photomatix and special purpose image processing can excel at certain things, but imo they can also do their own damage. the OP photomatix result to me looked overdone in HDR. Perhaps that wasn't the intent when comparing the two, but this image looks to me much more similar to the HDR results I see in adobe products

Brian

Brian
 
On the other hand, if Brett means retaining all the original raw information of the totality of LDR images fed into the HDR process, then I don't believe this is true. A single file which retains all the raw information from all the original LDR images requires a bit depth bigger than that of normal raw images. If a photographer wants to create an intermediate file that retains all information from all original LDR images, they usually do so using EXR file format, which is a 32-bit exponential format. Photoshop and Photomatix can process these but LR apparently cannot.
Merge to HDR in Lightroom uses a 16 bit floating point bit depth which is comparable to 32 bit but is more efficient. We are talking about millions or billions of possible levels, many many more than would ever be needed. It does this using the DNG file format which is very flexible.

Let’s be generous and say your camera has 14 stops of dynamic range. You have 3 images that are 3 stops apart so you if you merge them you have added 3 stops to the highlights and 3 stops to the shadows so now you have 20 stops of dynamic range. Far fewer than the max 16 bit floating point can handle.

I am not sure about what is meant by "When you merge HDR in Lightroom it retains all the original raw information". If this means original raw information after LR has done the merging, I believe what Brett says, but that's not good enough for me. If the HDR merge results in clipped highlights, retaining the clipped hightlights is exactly my problem.
I can’t actually use the photos you provided for auto hdr merge because they lack the necessary metadata but if I use my own photos I can show you. Below these two photos are 3 stops apart from each other.Owen-2.jpg
Owen-1.jpg

Just on their own I can only adjust the exposure slider 10 stops, down to -5 and upto +5 EV.
Screen Shot 2022-01-09 at 11.14.49 AM.png
However, when I merge them to HDR in Lightroom, Lightroom now gives me the ability to adjust up to 20 stops, +/- 10 stops (I don't have that much dynamic range from just these two images so it looks black at -10 stops)Screen Shot 2022-01-09 at 11.17.49 AM.png
The unedited HDR looks like the highlights and shadows are clipped but that's because we now have to tone map the image to get all that information in legal values. Screen Shot 2022-01-09 at 11.19.52 AM.png
After we tone map the image using the Lightroom controls we have now brought all the information into the legal range and can continue to tone to taste
Screen Shot 2022-01-09 at 11.26.02 AM.png
A good final result might look something like this.
final-1.jpg
However, I more often do these manually in Photoshop not with the HDR Pro tool but by using masks to manually blend the multiple exposures together like my pervious post. With HDR we are mainly concerned with highlights and shadows so it’s easy to make a mask of the highlights for the darker exposure and via versa for the brighter exposure. That gives ultimate control over the process.
 

Attachments

  • Owen-2.jpg
    1.2 MB · Views: 1
  • Owen-1.jpg
    3.5 MB · Views: 1
  • Owen-1.jpg
    3.5 MB · Views: 1
Last edited:
I think this post sums it up for me. The OP'sresults didn't look like HDR output from LR that I have experienced, it looked like the first exposure at +0. It's possible the settings, auto vs manual were somehow gummed up.

I agree photomatix and special purpose image processing can excel at certain things, but imo they can also do their own damage. the OP photomatix result to me looked overdone in HDR. Perhaps that wasn't the intent when comparing the two, but this image looks to me much more similar to the HDR results I see in adobe products

Brian

Brian
I agree. The LR output is not optimal as shown, but there is far more control available. The Photomatix version is way oversaturated and unnatural, which is why I stopped using that program a few years ago. Even working the low-resolution images posted you can do better in LR, Affinity or other programs:

HDR.jpeg
 
What Lightroom's HDR merging does is basically give you a higher dynamic range RAW file that incorporates the information from each of the bracketed exposures. It's then up to you to process that raw file so it looks good, You can use auto settings to get a preset HDR look, but in general I'd rather have the control to do it myself with masks etc.
 
  • Like
Reactions: brett8883
What Lightroom's HDR merging does is basically give you a higher dynamic range RAW file that incorporates the information from each of the bracketed exposures. It's then up to you to process that raw file so it looks good, You can use auto settings to get a preset HDR look, but in general I'd rather have the control to do it myself with masks etc.
Yep exactly
 

DJI Drone Deals

New Threads

Forum statistics

Threads
130,598
Messages
1,554,236
Members
159,603
Latest member
refrigasketscanada