From what I recall there is no difference between left and right. This will work.
To replace you will have to remove the rear motor arm which will include de-soldering the motor control wires from the power controll board.
This job requires small Phillips and torx drivers so have an assortment such as an electronics hobby kit ready. A small plastic pry-tool and fine tweezers go a long way as well.
You will have to:
- remove top cover (there may be 2 screws above the gimbal) and the grey 'dji' sticker at the back.
- remove the upper housing screws and pop off the upper housing.
- remove many components from the core motherboard (antenna leads, gimbal and vision connectors etc... but you can leave the GPS connected).
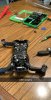
- carefully lift up the motherboard and put aside, now you should be able to see the power control board.
- get a decent solder iron and electronics-safe flux and remove the 3 leads of the damaged arm.
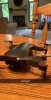
Remove the arm, replace the pivot shaft and re-assemble.