I have been taking quite a few 360 photos with my Mavic 2 Pro recently, and by far the hardest part is completing an authentic sky. Although the Mavic can do this with its onboard software, the result is usually just a blurred rectangle at the top (i.e. if there are patchy clouds then it cannot replicate this).
My current workflow has been as follows:
1. Import the 26 raw DNG files into Photoshop and adjust the Camera Raw settings
2. Apply lens correction to remove vignetting
3. Import the corrected JPG files into PTGui and stitch them together
4. Open the stitch in Photoshop and apply content-aware fill to the black sky missing at the top
This usually results in a straight line at the seams of the image.
5. Enter the 3D workspace in photoshop and use the clone stamp tool to blend over the seams of the images
As you can see from a recent example (completed photo in Google Maps 360 photosphere) below whilst this works to a degree, I'm still left with a blotchy-looking sky which I'm not completely happy with. The last step in particular, using the clone stamp in the 3D workspace, is not exactly fast, somewhat limiting how much detail and effort I can put in.
Is there a better way to complete authentic-looking skies?
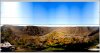
Stitched original from PTGui (after step 3):

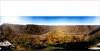
After step 4 and step 5 with content-aware fill applied and some corrections at the seam of the image:

Google Maps photosphere of the result so far (I'd like to improve on the sky in this).
My current workflow has been as follows:
1. Import the 26 raw DNG files into Photoshop and adjust the Camera Raw settings
2. Apply lens correction to remove vignetting
3. Import the corrected JPG files into PTGui and stitch them together
4. Open the stitch in Photoshop and apply content-aware fill to the black sky missing at the top
This usually results in a straight line at the seams of the image.
5. Enter the 3D workspace in photoshop and use the clone stamp tool to blend over the seams of the images
As you can see from a recent example (completed photo in Google Maps 360 photosphere) below whilst this works to a degree, I'm still left with a blotchy-looking sky which I'm not completely happy with. The last step in particular, using the clone stamp in the 3D workspace, is not exactly fast, somewhat limiting how much detail and effort I can put in.
Is there a better way to complete authentic-looking skies?
Stitched original from PTGui (after step 3):
After step 4 and step 5 with content-aware fill applied and some corrections at the seam of the image:
Google Maps photosphere of the result so far (I'd like to improve on the sky in this).