DJI Mavic, Air and Mini Drones
Friendly, Helpful & Knowledgeable Community
Join Us Now

Mavic Pro: why DJI doesn't fix this huge flickering/compression problem?

fnf your sharpness tests match with my observations, viewing video footage on large UHD screens, and within Davinci viewing on HD screens.
As Deadwing has been mentioning, we are all trying to get the cleanest high resolution look without the dreaded GOP strobes. One seems to work against the other in some situations. He rightly surmised when viewing those lovely high slow moving shots the compression pulsing artifacts don't show.
It's a hard one to know what to lock in on. I've had a lifetime of concentrating on creative content but also having to put huge effort into quality control. I was hoping that finally in this high tech era we could just concentrate on the content and the quality issues would be a thing of the past - not there yet unfortunately. It still amazes me what we can get out of something that fits in my hand - I used to have crews of 15 or so and trucks, helicopters, heavy 35mm cameras to get the same quality.

I totally agree, yesterday I went to another location with less 'trees' and grass, although still grassy and actually by the seaside, so also waves etc. I did some test footage, and as others mentioned here the only 'useable' sharpness settings are -1 0 +1 , as the others are just too far away from 'natural' looks.

And I also agree that selling Mavic as a 4k camera is just marketing for the ones who just use it for hobby or family/holidays videos or pictures, that is perfectly fine by me (and DJI!) but definitely doesn't mean it is a 4k camera. It is a 2k camera that can output 4k videos with some 'digital' stuff happening, simply is not what a pro or a prosumer needs.

From my filming yesterday I can see how, depending on situation and light, I could use sometimes 0 and maybe even +1, BUT as a professional I cannot afford to risk or even having to shoot same scenes more than once just to be sure, so the safest bet for very natural look is for me -1. I disagree on the fact that Mavic always applies sharpening and that with 0 or below it applies as well denoising...that would not make any sense as they're clearly trying (obviously!) to save CPU cycles in the machine.

I personally found that from sharpening -1 if I use a good in post a good sharpening (fine detailed with radius 1 or even 0.5), mainly on the highlights and darks and with some fine grain as well (the best sharpening tool) without anything like sharpening masks etc, I obtain a final image that is way better than the horribly (for me) cheaply sharpened +1 in the Mavic. Sharpen 0 would be ideal if we had more bandwidth, but as it stands it's risky so I don't use it, and -1 although makes footage a bit softer it makes the most even frames, it means is a the nearest we can have to RAW footage, and it allows a well tuned sharpening later to happen uniformly and recover many more details.

I also encoded my film from yesterday to Bluray and on a 52" HD TV it looks quite amazing and very 'filmic' (the 24p and grain and grading all done to do that obviously).

Very interesting topic, I only wonder how we could convince DJI on making available a 60mbps mode for 2k and 1080..
 
I personally found that from sharpening -1 if I use a good in post a good sharpening (fine detailed with radius 1 or even 0.5), mainly on the highlights and darks and with some fine grain as well (the best sharpening tool) without anything like sharpening masks etc, I obtain a final image that is way better than the horribly (for me) cheaply sharpened +1 in the Mavic. Sharpen 0 would be ideal if we had more bandwidth, but as it stands it's risky so I don't use it, and -1 although makes footage a bit softer it makes the most even frames, it means is a the nearest we can have to RAW footage, and it allows a well tuned sharpening later to happen uniformly and recover many more details.

I uploaded the test framegrabs with the intention that you could perhaps try to sharpen it to get back the details similar to the +1 sharpness photo. Would you mind giving it a try?.

From my eyes, I could see that the extra details in the +1 sharpness photo are really details and not just edge artifacts/halos. As someone who likes my photos to be sharp and is so used to editing at 100% magnification, I'm willing to accept the extra details with the unnatural edge halo (which could be softened again in post) vs. completely losing the details in the raw capture.

Having said that, I can appreciate that the 0 sharpness photo does look more natural so it would have been better if the extra details are still preserved without the artifacts, but it's a compromise.

Very interesting topic, I only wonder how we could convince DJI on making available a 60mbps mode for 2k and 1080..

Yes, that would be ideal. I guess DJI went with this because normal users otherwise would be confused as one would expect lower file size at lower resolution.

..Or maybe it was intentional, a 1080p footage at 60Mbps should open up a lot of possibilities in post.
 
I'm in the middle of a studio session but I'll try when I have some spare time :)

I know what you mean, personally I think in both cases is a compromise of some sort, and in my case is probably more on the other side as I more often than not 'smooth' any digital content as I like more natural analog looks (yes where details were less important and composition and grading and actual story were more..old age showing!!).

Anyway I agree about DJI, I just think that is a normal setting in many consumer level devices...a simple switch 'Smaller File Size' -> 'Maximum Quality' ...cannot be confusing, no more than JPG and RAW as at least is a very simple and self explaining setting.

It would open loads of possibilities...and loads of sales..and they could easily do it on all their drones...I honestly think they just didn't even think about it..very often explanations are the simplest ones :)
 
Well this thread is both frustrating and inspiring. My best footage so far remains a 1080 slow pan of forest and mountains, looking at a cloud filtered sun setting. There is no GOP pulsing that I can detect, and the somewhat dark trees are crystal clear. +1,0,0, but tragically I don't know what color profile was in use.

My worst shot in the context of this thread is a 2.7k shot of forest and bright cloud looking away from sunset this time, with -1,0,0 and what looks like truecolor (don't laugh I'm quite noobish) profile, the trees far away that have sunlight on them are crisp, but the foreground trees in shadow are not even trees, just blotched smears of green nonsense. Applying simple maximum sharpening makes the mountains look like they are going to scratch the glass on my display, but the foreground tress are literally totally unchanged.

I'm probably going to have to go out and do some proper testing with discipline and a good work ethic now, making note of settings and writing things down. Gee thanks guys.

Also wouldn't it be cool if we could pick a bitrate for our encodings independent of resolution? :)

@deadwing: thanks for the heads up about unsharp mask, I had no idea how inappropriate that was.

Hi about your trees in the DARK, I think that is a key concept and from your description it seems also the ideal example.

As others noticed, Mavic doesn't excel in the dark/shadows, just because the sensor is TINY, very small, and is physically impossible for 'weaker' photons to actually hit it.

With sharpness +1 the software tries to recover this a bit, and it's why since the start I keep saying the worse 'flickering' is in the shadows where it also makes exposure pulsating (because is all pushed by sharpness +1 but having only 1 frame every eight then the others don't get same treatment and are just an average that goes slowly back to the real 'mushy shadows' of the small sensor of Mavic).

I said this many times and I think might be important for your case: to solve this you don't use sharpness +1, but you simply use DLOG: the very simple reason is that shooting in LOG you need to expose for the second half of the histogram, and that means you will NOT have dark shadows in the original footage and so you'll not loose details with -1 (as I said DLOG correctly exposed is as important as sharpness setting).

With a ND filter you can contain the highlights, and so when in production you can actually push back the blacks and stretch properly the histogram, with the big difference that those shadows now will be as dark as you want but with all details you need, not like if you were shooting them so dark natively in the Mavic.

Is just a way to get the most natural and RAW footage from the Mavic (no dark shadows and not blown highlights, no GOP and no sharpness applied), to have the maximum possible 'natural' performance from that small sensor and enhance it later with tools that can do much more (and much better) than our Mavic builtin ones :)

As someone said here...is just about knowing the limits and strenghts and play with them...waiting for DJI to offer us a 'Smaller File Size' vs 'Better Quality' switch that is present in almost every photo/video device and that would help a lot them selling many more units :)
 
OK I got this now. WOOT!

By carefully setting exposure and using -1,0,0 and sharpening in post, rather than +1,0,0 and removing GOP pulsing in post (which I only marginally succeeded at), results are outstanding on various color profiles, and post cpu load is radically reduced. My green sludge effect in previous recordings appears to be due primarily to incorrect exposure.

My new favorite profile for non-gradable use is 'blockbuster' with careful sharpening and a dash of noise, I will use it for my zombie apocalypse movie. In appreciation deadwing, you can play the alpha zombie role. Much brains will be available for the eating.

In fact after doing this test, the +1 sharpened recordings pulse so horrifically as compared to the -1 'soft' ones, I'm amazed I ever thought it was a good choice, with the exception of at least one particular color profile, which had no pulsing, but I suspect it might happen to be a profile that actually sets the sharpening down into negative territory. Further testing required.

FUN!
 
  • Like
Reactions: joefilmmaker
OK I got this now. WOOT!

By carefully setting exposure and using -1,0,0 and sharpening in post, rather than +1,0,0 and removing GOP pulsing in post (which I only marginally succeeded at), results are outstanding on various color profiles, and post cpu load is radically reduced. My green sludge effect in previous recordings appears to be due primarily to incorrect exposure.

My new favorite profile for non-gradable use is 'blockbuster' with careful sharpening and a dash of noise, I will use it for my zombie apocalypse movie. In appreciation deadwing, you can play the alpha zombie role. Much brains will be available for the eating.

In fact after doing this test, the +1 sharpened recordings pulse so horrifically as compared to the -1 'soft' ones, I'm amazed I ever thought it was a good choice, with the exception of at least one particular color profile, which had no pulsing, but I suspect it might happen to be a profile that actually sets the sharpening down into negative territory. Further testing required.

FUN!


That's exactly the point, I do struggle to think that anyone would not noticing the huge difference between the bad (in my opinion) artifacts of the internal Mavic sharpening trying to recover details at +1 (or partly even 0) and causing all sorts of problems (and not good looking details), compared to getting a more RAW footage.

If anyone has experience working on RAW images, they always need sharpening, it's a standard process called RAW sharpening as those files are always 'soft' as they capture the reality as natural as possible to allow then professional sharpening (that expects a RAW kind of image) to do their job. Try opening any RAW image in Photoshop...you'll see the import apply automatically sharpening and color stretch (grading and sharpening) as it's standard. And this is why I'm suggesting here to get the most 'RAW' footage possible out of the Mavic, that means the most 'uniform' footage and in DLOG (equivalent to RAW pictures), taking away any sharpening from Mavic as it's not capturing more details, is just trying to digitally recover some of the defects.

And yes as you said, using Neat Video or DeFlicker not only never solves the problem properly (causing many other collateral other problems), but it takes forever to process...I can bounce a video graded/sharpened in a few minutes, if I use any NV or similar it can take 10x time...makes no sense to me as it's trying to adjust something that is not even part of the natural scene and was 'created' by the Mavic itself :)

I'll be happy to be part of your zombie movie, and happy to help...took me a full week of maths and most of all hundreds of tests in the field with real footage making the compression struggling with different scenarios, but now I'm happy. Below is the final footage/test I did with a mixed kind of situation. All is 2k DLOG 24fps (ND16 filter and 1/50 shutter speed) with Sharpness -1, then my standard post procedure involving simple levels, grading and some very fine/small detailing, producing the kind of cinematic end result in terms of 'looks' and 'feeling' that I need and that will mix nicely with my other professional cameras footage:

To view this content we will need your consent to set third party cookies.
For more detailed information, see our cookies page.
 
...took me a full week of maths and most of all hundreds of tests in the field[/MEDIA]

Indeed, and I appreciate you pointing it out along the way. I really enjoyed doing such testing myself today.

I can't watch any video due to my internet being via LTE only, out here in the bush, nor can I share anything. That's my excuse why it took me so long to clue in to the meat of this discussion. That's my excuse and I'm sticking to it!

Anyhoo, as I end with 1080p final product, but like the flexibity of being able to pan/zoom in post, I capture in 4K. Then I crop off the sides to make a double sized 1080 page, sharpen THAT, THEN resize down to 1080 afterwards.

I mention this because you favored doing 4K at -2, but in the single test today at -1, GOP strobe was obliterated entirely, on a slow pan scene with both complex foliage, and misty tight gamut cloud, using 'blockbuster' profile. The compression loss turned out exactly as one might hope, with smooth bright cloud gradient and crisp dark forest. All processing was done entirely in yuv 4:2:x.

After being blown away by the results, I set the player to max contrast and saturation, and a brightness roughly centered (viewtime grading I guess, but to find anomalies), and to my utter amazement the image remains viewable.

So I'm just tempting you to do some 4K tests with sharpening done before scaling down. I owe you at least that much after what you've put me through. :)

EDIT: Testing a nearly identical capture using log profile, and stretching the gamut out, the dreaded GOP strobe creeps back in. This might suggest that unless happy with stock profiles and being an exposure wizard, lowering sharpness further and/or reducing capture resolution as you suggested may be required.

EDIT 2: but by skipping the sharpen step on the above heavily graded (exploded gamut) log profile capture, GOP strobe is absent.
 
Last edited:
Indeed, and I appreciate you pointing it out along the way. I really enjoyed doing such testing myself today.

I can't watch any video due to my internet being via LTE only, out here in the bush, nor can I share anything. That's my excuse why it took me so long to clue in to the meat of this discussion. That's my excuse and I'm sticking to it!

Anyhoo, as I end with 1080p final product, but like the flexibity of being able to pan/zoom in post, I capture in 4K. Then I crop off the sides to make a double sized 1080 page, sharpen THAT, THEN resize down to 1080 afterwards.

I mention this because you favored doing 4K at -2, but in the single test today at -1, GOP strobe was obliterated entirely, on a slow pan scene with both complex foliage, and misty tight gamut cloud, using 'blockbuster' profile. The compression loss turned out exactly as one might hope, with smooth bright cloud gradient and crisp dark forest. All processing was done entirely in yuv 4:2:x.

After being blown away by the results, I set the player to max contrast and saturation, and a brightness roughly centered (viewtime grading I guess, but to find anomalies), and to my utter amazement the image remains viewable.

So I'm just tempting you to do some 4K tests with sharpening done before scaling down. I owe you at least that much after what you've put me through. :)


Thanks, yes I tried actually 4k -2, I think I wrote it somewhere before (too many posts!), and I said as well (confirming what you say) that from my findings 4k -2 is "almost" equivalent to 2k -1 with same image zoom ratio.

Details 'lost' with -2 are recovered by the 4k higher resolution, not always in the same way though (is very subjective here)..in general anyway yes, 4k -2 = 2k -1.

In my case though I don't justify having a bigger file for the same quality, it occupies more space and it takes more time to be worked. Also like you I end up on 1080p so in 2k I have already a lot of space to straighten an horizon or stabilise something (and so if I need some cropping margin). Literally 'zooming in' in either cases for me would not be viable as that camera is not that good, but 2k offers a lot of space for whatever cropping need I might have.

As someone else said I think the original 'resolution' of the camera is indeed 2k and the 4k is done internally, but I might be wrong: in general though I choose to go 2k -1 instead of 4k -2 just because it produces smaller files with same quality (sometimes subjectively better I think), and I also just feel like is better to use settings adjustment (sharpness etc.) as little as possible, so the 2k offers a -1 -1 -1 combination for me that I like.
 
  • Like
Reactions: Pathogen
Deadwing, would you mind posting the YouTube or Video link to your "Mavic Final" footage.
Downunder I'm seeing what looks like SD footage coming off the mavicpilots web site.

Also any chance next time you shoot using dlog can you do a screen grab showing the histogram ando video feed to your phone/tablet. Im trying to see a visual representation of your "shooting in LOG you need to expose for the second half of the histogram," explanation.
I makes sense what your saying, I just need to try and match your methodology.
I've currently got my MP in a bag of rice!! Forgot about it not having side sensors whilst doing a gorgeous shots of pelicans on a lake with dead trees scattered throughout.

Right here's the link
To view this content we will need your consent to set third party cookies.
For more detailed information, see our cookies page.
(if it appears again as a small video just click on the title and it brings you to the Youtube page).

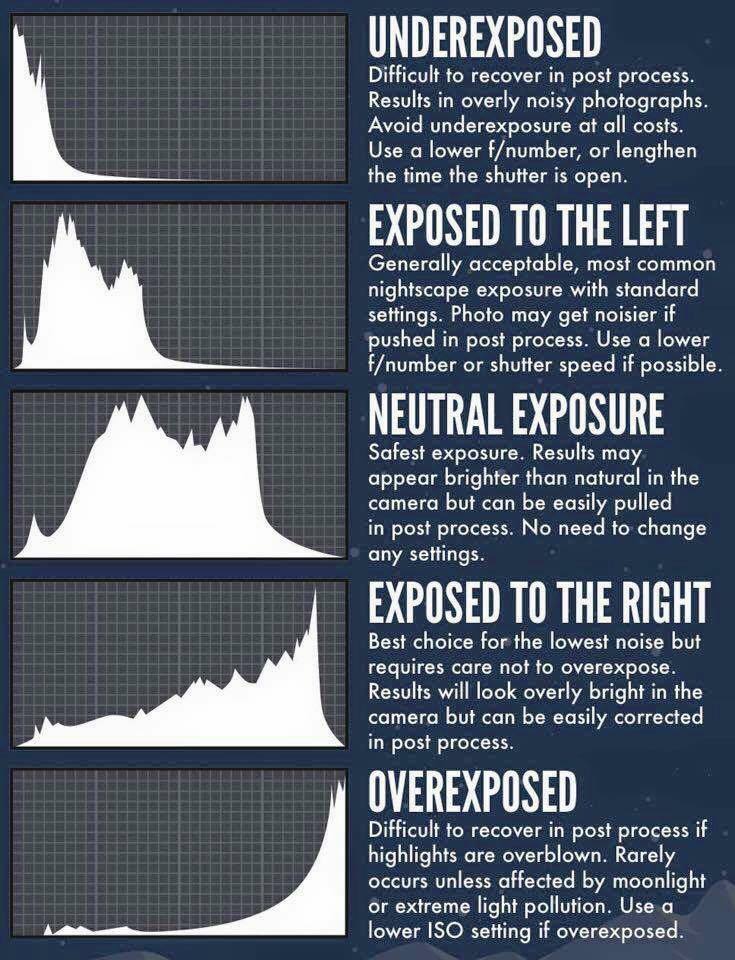
In terms of exposing, the picture I attach below shows exactly the point...if you shoot in anything than DLOG you can do the Neutral, if you shoot in DLOG you want to do the exposed to the right.
IMPORTANT: be sure to see the difference between Exposed to the Right and Overexposed (like between Exposed To The Left and Underexposed)...the difference is that there's no high peak near the end of the histogram, or more simply that the histogram ends on a low...that tells you you're not Overxposing or Underexposing.

Mavic doesn't have much dynamics, so a ND filter will help containing overexposure, as well as the Overexposure Warning option (the zebras). Sometimes you'll get some zebra here or there and is fine, but shouldn't be too much.

If you expose to the Right then in post you'll be able with Levels to stretch the histogram to the left and you'll get back with darker shadows and richer colours, keeping all details you need (is very common on digital non-pro cameras to have to expose to a left or right based on how the sensor works and what's the best way).

Sorry to hear about your Mavic...yeah I actually always fly it thinking that it doesn't have sensors at all so is me having to decide if shooting is safe or not...more than rice (that actually sometimes can impede condensation to escape if the mavic is immerged in it) I'd suggest using silica gel sachets, buy a ton of them and close the mavic in a bag with them..a good alternative is silica crystals, AKA cat litter :D (the one made with silica crystals), much better and more effective than rice in my personal experience.


lynh-phan-tip-histogram.jpg
 
Huge thanks for info. Looking forward to trying all the suggestions.
Fingers crossed to Mavic working after 16hrs underwater. Recovered the SD card and footage was magic, looking at it no wonder I got carried away with looking at the camera feed and not straight at the Mavic. Oh well, you learn by your mistakes....
Luckily I have care plan as fall back.
 
So as promised I went through some more test ...

So my conclusion is that 2k Sharpness -2 is the safest bet for both 30fps and 24fps, but for less demanding scenes (and when you can maybe do a test shot and check) you might use 2k Sharpness -1 at 24fps.
...
Hi, and thanks for all this testing a lot!!, I read very curiosly through all your posts now.
In the meantime I have one immediate question. Did you ever encounter a "watercolor effect"?
- Since I read you recommend -1 or -2 sharpnes setting. But my experience shown me, that giving sharpness setting to anything lower than 0 results in watercolor effect (esp. visible on green trees under lower light conditions - the tree crowns get blurry and wattered from the strong Mavic noise reduction - completely loosing the detail of 4k footage)...

This issue was partially repaired by FW .700, and is almost not visible when filming on other modes than d-log. Also using the ND or ND-PL value 16 helps a lot for me.

Feel free to check some samples of my few vids here:

To view this content we will need your consent to set third party cookies.
For more detailed information, see our cookies page.
Dronespire

(I am not using colorgrade or other sophisticated methods yet) my intention was to get as good images as they get - allready from Mavic itself (and potentially cut it on iPad when travelling to my office by the train)...

Cheers :)
W.

Hi

about the 'watercolor' effect it seems to be the most asked question, I replied (with my own solution) just a few messages before, as it's easy to fix and is not a problem of the sharpness settings (although is influenced by it).

Mavic has a small tiny sensor (even compared to a modern mobile phone), so it's normal it struggles resolving details in the shadows, and you get that watercolour effect (in particular in DLOG if not correctly exposed). Using sharpness to recover it is not good, as it's a digital process in the Mavic trying to recover a physical limit of the lens (and Mavic doesn't have obviously much power for processing or fine processing).

The solution is to actually USE DLOG, but be sure to correctly expose (just read a couple of messages before where I posted Histogram example as well): DLOG by definition must be exposed for the lights, so the right (without burning the highlights). In that way you give to the Mavic sensor enough light even in the shadows to capture all details (and no watercolour) in the shadows. Out of the camera the footage will look kind of blah and on the bright side, but that's actually correct and how DLOG looks like (that we can consider here the most RAW footage we have on Mavic).

You have now a footage with everything, you just need to stretch the histogram back to the left and so bring back the shadows to darkness as much as you like, BUT you'll keep all details as you recorded them in the first place (and without any processing my the Mavic).

Many others noticed that Mavic is (obviously) not a champion in low light condition, so the correct way is to expose for the highlights.

I'm afraid that is not really possible to get 'good enough' footage straight out from the Mavic, to be honest with you....when you try that, you jump from 'watercolour' (sharpness under 0) to flickering (sharpening >= 0). BUT to be honest, on an iPad there are today many 'pro' video editors (as I do the same) allowing you to easily edit your footage, and then correctly grade the footage stretching the histogram and adjusting color balances (LUTs are just a shortcut that I think is completely useless if you want to actually do it fast and the way you like).

BTW I watched the video, very nice place and shots! On about half of the shots I can see details flickering and shadows flickering...I would personally not be able to use those, but as usual it depends from personal preferences, posting a video on Youtube for the average viewers such stuff is not evident nor disturbing probably!

But would disappear using -1 sharpness in 2k (not 4k) with 24fps (not higher) in DLOG and adding back later the contrast of the scenes (being careful in exposing correctly)..I think you might get even more contrast probably!
 
and is almost not visible when filming on other modes than d-log.

(I am not using colorgrade or other sophisticated methods yet) my intention was to get as good images as they get - allready from Mavic itself

I haven't tested ALL of the color profiles, but CINE, LOG, and TRUECOLOR appear to be using a compressed color gamut. One could argue that these profiles are not actually intended for normal use, but rather they are made to deal with high contrast scenes by squeezing them, to later be expanded back and color graded.

Other color profiles like FILM, COOL, BLOCKBUSTER, are not compressed in that way, and ***assuming you get exposure settings correct***, don't require those sophisticated methods of post production. I would disagree with deadwing on this, and say that you CAN get fantastic results right out of the camera. Use his recommendations of 2.7K @ 24fps, with sharpness at -1, set your ISO to 100, and then adjust shutter speed until everything fits into the histogram. You could also raise your ISO to accomplish the same way, just know you will be adding noise, which may or may not be an issue.

You can do the same with 4K or even 2K resolution, but as deadwing has discovered, doing so changes the way the sharpness setting affects the video, so don't hesitate to push sharpness down lower for 4K, and for 2K I don't know what to do in that case yet. :-)
 
My understanding of best approach -
It almost looks like we need to decide how we are going to use the footage, and what the footage is of.

1: If it's just 'playing around footage', mainly will just be viewed without editing and you leave camera exposure on auto.
Shoot 2.7k (or 4k If your viewing device can handle it)
+1, 0, 0. No Colour mode.
This uses the inbuilt sharpening to stop the blurry watercolor effect on darker foliage, increasing detail in the foliage, but also increases the chance of compression strobe, and puts a slight overly crisp look to the footage on contrasty objects within frame.

2: If you intend editing and colour grading, and are prepared to ride the exposure settings for each shot while filming:
Shoot 2.7k -1, -1, -1 Dlog.
This "lifts" all the darker foliage up in exposure into an area the compression can actually record the detail.
The non-sharpened image reduces strobe whilst recording/compressing. Use grading in edit to bring image back to normal exposure. Add slight sharpening at this stage.
.................................................
When I get my Mavic working (hopefully) I'll do tests following these approaches and post back here my observations.
..................................................

Aside from the above.
Was watching last night my salvaged SD card 4k footage shot at magic hour at a swamp, moving camera, shot into the sun a lot, glassy black water, lots of leaf foliage plus hi-contrast white dead trees (the ones I crashed into!). So shots were having to handle huge contrast and exposure variations within the frame. I'd shot 4k (UHD) -1, 0, 0.
Viewed on a good 55" UHD screen straight off the SDcard.
I barely noticed any strobing or compression defects. The overall detail between dark areas and bright areas was amazing, and colour rendition was gorgeous. The only minor problem was the sharpened edges on the bright white branches. My ideal would be if they could use a sharpening algorithm that leaves the existing hi-contrast edges alone. This footage will certainly be a good source for editing and grading.
My belief is we have more problems coming out of the next stages of presenting for viewing. What compression program and settings to use for the final product? etc. Most Mavic user's end results are shown on Youtube/vimeo/websites etc or sent as compressed files. (DVD/Blu-ray is practically dead here). I've had so many great looking edits in Davinci only to spend frustrating hours searching for the right compression/file format to maintain the quality. Even uploading low compressed large files to YouTube, it seems to crucify footage with moving foliage. I start with huge multi GB files but these are impractical as a distribution file. I've been using Handbrake and best results are coming from the new hevc h.265 format, problem is not a lot of current support.
This area to me is probably as big a concern as the compression artifacts within the Mavic. Hopefully I haven't hijacked the thread.
 
Last edited:
  • Like
Reactions: joefilmmaker
(compression).
multi-pass X264 is generally going to be the best bet, most devices have hardware decoding for it, and the compression ratio is about as good as its going to get. I use XMEDIA RECODE, a very comprehensive and free multi-format encoder with presets for just about everything, frequently updated. You can get very serious about compression, and change a lot of advanced settings to customize the process based on scene content. One scene might be high motion, the next might be high detail, etc. The masters of video compression encoding are practicioners of a modern day art form.
 
  • Like
Reactions: joefilmmaker
multi-pass X264 is generally going to be the best bet, most devices have hardware decoding for it, and the compression ratio is about as good as its going to get. I use XMEDIA RECODE, a very comprehensive and free multi-format encoder with presets for just about everything, frequently updated. You can get very serious about compression, and change a lot of advanced settings to customize the process based on scene content. One scene might be high motion, the next might be high detail, etc. The masters of video compression encoding are practicioners of a modern day art form.

Exactly that! I fight with encoders since the times of mpeg and early DVDs and then satellite TV, in the end there's no one magic formula, you have to decide and tweak encoders based on delivery media and most of all based on what you're shooting (and what are the needs, in terms of quality and bandwidth available etc.). Anyway if you upload on the internet there's not much sense in this, as that averages more or less everything...what I do I just do a RAW footage out of Final Cut (Apple Prores usually quite a lot of gigabytes) that is also a master of my work that I can save for future use in max quality, and I upload that on Youtube, so that Youtube compression at least works on the highest quality I can give.

About the rest, as Oglo noticed the +1 does also flickering and 'fake' sharpening on highlights (branches hit by sun), to be honest I personally struggle finding it any natural...I think most of Mavic footage around has flicker and looks fake because that 'wow is sharp and detailed' factor is to my (trained to be honest) eyes really 'gross'...so I'd push everyone to raise their bar and actually start looking for these artifacts...in the end you'll start a journey that will make your videos not look like "wow is so detailed" but "wow it looks so professional"...because it's what it is, professional doesn't look sharp or detailed, it just looks "professional" ;) Try!

I also agree with Pathogen in terms of DLOG...the most important settings are 2k 24fps -1 -1 -1, then the color is a choice..I would say that for ANY contrasty scene (that means every scene outdoor with sunshine and that includes part of the sky in the frame or objects lit by sky and dark shadows) you actually need DLOG to correctly expose, because I know it looks like it has a limited gamut but like all RAW footage the reality is the opposite..what to our eyes looks like more 'contrasty' has in reality less dynamics (that is the amount of range you get between lights and darks, not how contrasty is the image).

On the other hand, other colour modes can be used for non contrasty scenes, but I'd say why when all you need in post for DLOG is stretch a histogram, something that every video editor (also on mobile phones) allows to do? Using other colours you'll be less able to correctly expose shadows so you have to be much more careful than DLOG, but yes indeed you use them as Pathogen said to have a video ready :)
 
  • Like
Reactions: joefilmmaker

DJI Drone Deals

New Threads

Forum statistics

Threads
135,080
Messages
1,602,159
Members
163,567
Latest member
logant1234
Want to Remove this Ad? Simply login or create a free account